General Information

Help Desk: Contact for general troubleshooting and login issues: 716.828.6300
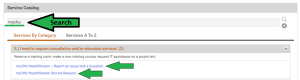
Submit Requests: Use one of the links below and search for mychu.
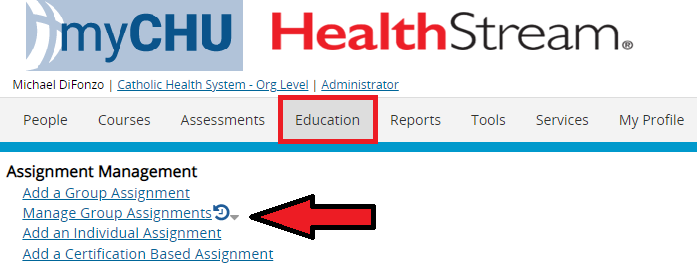
QSARF (HealthStream Admin Requests): To be able to run reports, assign courses, register people for classes. Make sure to specify what rights are needed and include the site/department codes.


ChangeGear IT Portal Service Catalog (IR – Report an Issue | SR – Service Request)

Go to ChangeGear then click 3 Bars then go to the Service Catalog
Searching for Services in ChangeGear
IR – HealthStream Report an Issue/Ask a Question: To be used for issues that you may be experiencing in HealthStream. This is NOT to be used for Service Requests (Course/Curriculum creations and updates, training, or any other HealthStream-specific services).

SR – Service Request: To be used to request HealthStream-specific services.

  • New course/curriculum creation (attach the course request template located in M-Files)
  • Course/curriculum updates
  • Training on the various features that HealthStream offers
  • Any other HealthStream-specific services

Service Request is NOT to be used for issues that you may be experiencing in HealthStream. Submit a ticket instead at myCHU HealthStream – Report an Issue/Ask a Question. Submitting this form for issues will cause delays in service resolution.

M-Files (Course Request Template):- To be attached to the Service Request when requesting the build of educational content.

The My Team dashboard enables supervisors to see which of their direct reports have assignment items that are past due or approaching their due date, or expired/expiring licenses or certifications. Supervisors can also view profile information about their direct reports, which includes To-Do List items and assignment completions.

The dashboard contains widgets, each of which displays data about a certain type of item (e.g., certifications, learning items). Widget data is updated hourly. Clicking a widget opens an employee list that displays the employees associated with the widget type (employees with expired certifications, employees with outstanding learning items, etc.).

The Employees panel on the left-hand side of the dashboard provides direct access to profile information about each direct report.

You can even assign someone else to be your proxy so that they can view your My Team Dashboard.

Learn More:
Click to see a Show Me How Video tutorial list.

Proxy managers are users who have been given the ability to view another supervisor’s My Team page.
To add proxy managers who will be able to see your My Team page:

  1. Click the My Team tab to open the My Team page.
  2. Click the My Proxy button to display a list of your proxies.
  3. Click the Add Proxy button to open the Select Proxy page, which displays a list of employees.
  4. If you need to narrow the list, you can enter filter terms in the Refine section and click the Apply button.
  5. Select the button next to the name of the person you want to add.
  6. Click the Add Selected button to add the person and return to the proxy list.

My Team Proxy Management for Managers
https://healthstream.mediaspace.kaltura.com/media/Proxy+Management+for+Managers/1_8cuasofr

Students:

Review the Login Tip Sheet and search the HealthStream Online Help System which will provide you with the information you need to get the most out of your HealthStream experience.

Video Tutorial:

HealthStream automatically imports people via data files from other systems. They would need to be termed according to the processes used in those systems. Once they are termed, HealthStream will automatically update twice a day.

Internal associates in Lawson: direct reports should be termed in Manager Space.
3rd party vendors (not in Lawson): send a termination email to Helpdesk@chsbuffalo.org (Subject: Terminate Access; Body of message: their name; company name; associate ID, if they have one).

Admin Functions

Admins:

Review the Quick Tip Sheet and search the Administrator Online Help System.

Review the full myCHU HealthStream myCHU Admin Reference Manual.

You can also self-enroll into the various Administrator courses in HealthStream to learn more (the direct links below will only open if you are currently logged into HealthStream as a Student. You can also self-enroll by searching for “Admin” in the HealthStream Catalog under the Student/Manager sign-in. After July 1, 2022 use the search term hstm fundamentals or hstm learn.):

HSTM Fundamentals: Assignments (23 min): This interactive module provides the foundational knowledge and skills to: Define assignments. Differentiate between the two assignment types. Define assignment timing fields. Define recurring assignment fields. Add an individual assignment. Add a group assignment.
HSTM Fundamentals: Assignment Management (16 min): This interactive module provides the foundational knowledge and skills to: Edit an assignment. Copy an assignment. Delete an assignment. Hide an assignment. Define exemptions. Exempt users from an assignment.
HSTM Fundamentals: Reporting (15 min): This interactive module provides the foundational knowledge and skills to: Describe reporting. Describe required data. Navigate the reports page. Describe report groups. Describe report configuration options. Generate a report. Print a report. Export a report. Schedule a report. View a scheduled report. Manage a scheduled report. Run a scheduled report.
HSTM Fundamentals: Student Groups (18 min): This interactive module provides the foundational knowledge and skills to: Describe the difference between individual and profile groups. Use the correct naming conventions when naming groups. Identify the groups to which any given user belongs. Add a profile group, exclude users from a profile group, add a profile group using Hire/Rehire date criteria, add an individual group, delete users from an individual group, edit a group, delete a group, copy a group, and hide a group.

Click on the link under your name in your Student account to switch back to your Admin account.

Click on the Administrator link next to your name to switch to your student account.

To add ILT class sessions you need Administrator Instructor access. If you do not have such access, complete a QSARF Request.

Once you have the proper admin access make sure that there is a course already created that you can link the class sessions to. If no course exists, submit a Service Request to have the course created.

Once all of the above has been completed, utilize the HS Creating a Class Checklist and Directions.

For staff that are not renewing or no longer need certifications or resuscitation credentials that are documented in HealthStream, you have the option to manually retire these items. Retired items do not appear in the Expiring Certification report or any applicable Alerts that is enabled, like “Student Certification Expiration Date Approaching.”

Admins can go into the Associate’s Resuscitation Credentials > click into the credential > scroll to select Retire.

Retired items will still appear on My Team and the Resuscitation Performance Dashboard without an indicator that they are retired. Managers can “hide” these items on My Team.

Associates can go to their Profile tab to retire their credentials.

Assigning Education

Assigning Required Computer Based Learning (CBL) – Department Specific Orientation Checklist (HRF 19 Policy)

There are certain CBLs that ALL CHS Associates are required to complete under the HRF 19 Department Specific Orientation Checklist. Instead of searching for each individual course, you can assign the Curriculum that already contains these courses.

NOTE: some CBLs that are site or department-specific will still need to be assigned separately. This curriculum will ONLY assign CBLs that are required to be completed by all CHS Associates.

Create an assignment and name it. Click Search Learning Items.

Search for hrf. HRF 19 Curriculum will be displayed (noted by the stacked books icon). Note: version date may be different if the curriculum has been updated. Click to select the curriculum then click Select button.

Curriculum has now been added.

Enter the Go-Live, Due, and End Date (recommended to be later than Due Date). Enter an earlier Effective Date (recommend 1/01/current year) to Apply completions so that they do not get reassigned a course if they have already completed it prior. Click Save.

Student has now been assigned the HRF 19 curriculum which contains the required CBLs for all CHS Associates. If other CBLs are required for a specific site or department those would need to be assigned separately.

Video Tutorial:

In most cases, Epic Security courses are assigned in HealthStream automatically based on the Epic Security role that is requested for an associate. Epic Security roles are requested by the manager via QSARF process. Once a request has been approved, the associate is automatically assigned the required courses specific to that Epic Security role. Managers may still need to register the associate to specific available live ILT class sessions.

For more information, contact the Epic Training team.

To search for the Epic ILT classes that nurses in PCS need to be registered for, review the directions for How do I register an individual to a live ILT (Instructor Led Training) class session? For nursing, look for the following under Education tab > Manage Classes:

  • Searching inpatient nurse brings back both Day 1 and Day 2 classes or they can search individually for Inpatient Nurse Day 1 or Inpatient Nurse Day 2.
  • Search ed nurse to bring back both ED Nurse 100 and ED Nurse 100 or search by ED Nurse 100 or ED Nurse 101 for the individual classes.
  • Search ed tech to find the ED Technician class.
  • Nothing needs to be assigned for Patient Care Tech, that is auto-assigned CBLs only, no class.
  • Nursing assistant is the same as patient care technician. They receive auto-assigned CBLs only.
  • Nothing needs to be assigned for Unit Clerk/Coordinator, that is auto-assigned CBL, no class.

If you want to see all Epic ILT nurse classes, you can search for Class Name: nurse and Course Identifier: 2.0 (Epic courses are designated with this).
Don’t forget to uncheck the Class Affiliation (ex. CORP – Employee) or no results will appear.

Search words can be used to find a particular course when assigning. Note that some CBL courses only appear when assigning and not when searching under the Courses tab. ILT courses are searched under the Education tab (Manage Classes) and you must uncheck the Class Affiliation or 0 results will display.

View the recommended search words to use here: HealthStream Course Search Key.

Creating student groups make it easier to assign education to a group of people all at the same time. It is recommended you set up your groups based on how you typically assign education.

Learn More

Tip Sheet: Creating Assignment Groups for Managers

Course: HSTM Fundamentals: Student Groups (18 min): This interactive module provides the foundational knowledge and skills to: Describe the difference between individual and profile groups. Use the correct naming conventions when naming groups. Identify the groups to which any given user belongs.

Review the directions on how to create Student Groups for assigning first. Using groups to assign CBLs will make it easier for you to make bulk assignments and decrease the amount of time spent on this activity. Since you have assigned the education, you will be able to track on your My Team tab (located on your Student login) if they are completing the required education on time.

Once you have created your Student Group, you can assign education to that Student Group.

Video Tutorial:

Learn More

Tip Sheet: Assigning CBLs to a Group

Courses:

  • HSTM Fundamentals: Assignments (23 min): This interactive module provides the foundational knowledge and skills to: Define assignments. Differentiate between the two assignment types. Define assignment timing fields. Define recurring assignment fields. Add an individual assignment. Add a group assignment.
  • HSTM Fundamentals: Assignment Management (16 min): This interactive module provides the foundational knowledge and skills to: Edit an assignment. Copy an assignment. Delete an assignment. Hide an assignment. Define exemptions. Exempt users from an assignment.

Creating groups to assign CBLs will make it easier for you to make bulk assignments and decrease the amount of time spent on this activity (review Assigning CBLs to a Group for reference). These directions are for the times where you need to assign education to just a single individual.

Video Tutorial:

Learn More: Assigning CBLs to an Individual

To search for all Clinical Education ILT live classes, login as an Admin and go to the Education tab > Class Management > Manage Classes.

Under Course Identifier, search for clined. Don’t forget to uncheck the Class Affiliation (ex. CORP – Employee) or no results will appear. Click Search and all scheduled Clinical Education ILT classes will display.

You can view your direct supervisees that have been assigned a course but are NOT yet registered for a specific class session. Managers can login to their Student account and click My Team tab. You will only have this tab if you have direct reports, as recorded in the HRIS (Lawson).

Locate the widget labeled Employees with Upcoming Classes to view associates that are registered and not registered. Click NOT REGISTERED and a list of associates will be displayed. Locate the Associate that you would like to register for an upcoming class. Click Register to view a list of available classes. Select the desired class session to register the student.

Some classes may have restricted enrollment so you will need to login to your admin account to register the students for the specific classes. If a student has NOT been assigned a specific course containing a class session, they will NOT appear on the widget.

Viewing Instructor Led Training (ILT) Live Class Schedules

Students:
Students can click Event Calendar tab to view classes that they can Register themselves into. Some classes will only have the option to View Info and they will need to have an Admin register them into the class. Note: some classes may NOT appear on the Event Calendar at the request of the Instructor where registration does not allow self-enrollment.

Admins:

Click Education tab then View Calendar.

Click on a specific date on the calendar to view classes for that date. You can also filter to display by Day, Week, or Month by clicking the corresponding tab. Click more under a date to view additional classes that may not be displaying. Review the How do I register an individual to a live ILT (Instructor Led Training) class session? to learn how to register students to a class. Note: You can also click on Class Management: Manage Classes to view upcoming classes.

To register an individual to a live ILT class session you need Administrator access. If you do not have such access, complete a QSARF Request.

Once you have the proper admin access you can search for a list of scheduled classes that are available for you to register an individual. Utilize the Assigning Live Classes for Individuals.

Video Tutorial:

Go to Education tab > locate the assignment > Enter a date in the End Date.
This will remove all of the courses from the targeted group’s To Do tab as a required assignment and stop the overdue alerts from being generated.

Use the condensed directions below or view the full End Group Assignment directions.

Checklists

You will need to be assigned to an Evaluator Student Group by an admin so that you can validate the students. Once you have been added to the Student Group, login to your Student account and click the To Do tab. On the Options widget, click Evaluate Checklists.

Learn More:

Complete the course Checklist: Evaluator Overview (9 min). This course is designed to provide you with the foundational knowledge and skills needed to 1. Describe the roles and responsibilities of Checklist. 2. Complete the validation of a checklist.

NOTE: This course is designed for validating the HealthStream Checklists. The Elsevier Checklists are very similar but may have a slightly different process for the actual grading of the checklists.

Reports

The following reports, located on the Admin Reports tab, are recommended for the most useful information:

Education Reports:

  • Assignment Completion – Schedulable
    • Tracks associate status toward completion of assigned courses only. Shows statuses of Past Due, Not Yet Due, Completed, Delinquent and Exempt. 
      Note: Delinquent status means course has either dropped to Elective on user To Do List (user can still complete) or has completely dropped off of user To Do List (user cannot complete). 
       
  • Course Completion – Schedulable
    • Shows associates with completions only, associates that are incomplete only or both. This includes assigned and/or self-enrolled courses. Note: Click Select Learning and choose the courses you want searched.

Assignment Completions and Course Completions Reports can be found on the My Teams tab > Reporting widget. They are also located on the Admin Reports tab (Admin login needed)


People Reports:

  • Student and Group Transcript
    • Provides a Transcript Report for student(s) that is useful for annual performance reviews or regulatory agency requests.
  • Student Listing
    • Provides a list of students in a selected department and the associated User IDs that can be utilized to add to Student Groups, Assignments, Classes, etc.
  • Expiring Resuscitation Credentials
    • Provides a list of associates with expiring resuscitation credentials.

NOTE: Select the desired Date Range remaining or Expired.
Recommended selections:

  • I want to: Report by Certification (example: American Red Cross BLS.)
  • Select All Certifications
  • Include Data: Include Expired certification

Course Reports:

  • Course Listing
    • To view all of the courses that are available in myCHU HealthStream, run the Course Listing Report.

NOTE: Reports have an option to export to Excel which allows for easier data filtering.

  • Review the full Reports – Running Course Completions and Reoccurring Reports. This will allow you to run reports under your admin account.
  • Self-Enroll into this Admin course:
    • HSTM Fundamentals: Reporting (15 min): This interactive module provides the foundational knowledge and skills to: Describe reporting. Describe required data. Navigate the reports page. Describe report groups. Describe report configuration options. Generate a report. Print a report. Export a report. Schedule a report. View a scheduled report. Manage a scheduled report. Run a scheduled report.
  • Managers can login to their Student/Manager account and click on My Team tab:
    • Click Past Due to view people with overdue learning. You can also download the report.
    • Run a report on the Reporting widget.

Follow these directions to run a completion report for system-assigned education such as for the Annual Mandatory.

Directions 01 (may contain duplicate assignments if a manager re-assigned the education):

  1. Report tab > Assignment Completion – Schedulable
  2. Learning: Select an Assignment > Assignment Name: [search for 0] > [Select desired assignments] > [Example: 0 20230102 Annual Mandatory – CHS Only (Excludes Acute Nurses)] > Select
  3. Click Continue
  4. Export as Excel
  5. Filter Due Date so it only shows 6/30/2023 (for CHS Only (Excludes Acute Nurses)]
  6. If you selected the 0 20230102 Annual Mandatory – CHS Only (Acute Nurses) assignment you would filter by 11/30/2023. HC and LTC have different assignments and possibly different Due Dates
  7. Filter Completion Date > Select [Blanks].

You now have the people that were assigned but haven’t completed the course. Keep in mind a few people may have completed it but were re-assigned by a manager.

Directions 02 (this will ONLY display people specifically assigned by the system but it may be a little slower and only slightly more complicated):

  1. Reports tab > HealthStream Analytics: View Reports
  2. Click Subscribed Custom Report Libraries; Click Magnifying Glass Search icon
  3. Select Learning – Assignment Completions
  4. Assignment Name: [Select desired assignment. Example: 0 20230102 Annual Mandatory – CHS Only(Excludes Acute Nurses)
  5. Assignment Due Date > Current Year
  6. Click Update Results
  7. Click down arrow next to Excel icon > Export to Excel
  8. Filter Completion Date > Blanks
  9. Filter Supervisor > Sort A to Z

The Student Listing report displays the job title, department, and status for selected students.
To run the Student Listing report:

  1. Click the Reports tab to open the Reports page.
  2. In the People Reports section, click the Student Listing link to open the report criteria selection page.
  3. Click the Select Student Criteria link to open the Search Students page.
  4. Enter search criteria or select the desired options to filter the search. If you keep all of the default options and click Search, you will generate a report of everyone that you have access to.

Expiring Resuscitation Credentials Report provides a list of associates with expiring resuscitation credentials.

Click Reports tab > People Reports: Expiring Resuscitation Credentials

Under Date Range, select the desired days remaining or select Expired.

Recommended selections:

  • I want to: Report by Certification (example: American Red Cross BLS.)
  • Select All Certifications
  • Students: Report on All Students
  • Include Data: Include Expired certification (will be already checked if you selected Expired for Date Range)

Click Reports tab > People Reports: Expiring Resuscitation Credentials

Under Date Range, select Show credential between:
Enter the following dates: 1/1/2018, 12/31/2050.

Select Report by Certification (example: American Red Cross BLS).

Select the desired certification(s).

Select Report on All Students or Select a Student Group.

Select Include students with no certification information.

Click Continue.

To view all of the courses that are available in myCHU HealthStream, run the Course Listing Report.

Click Reports tab > Course Reports: Course Listing.

Include Courses with learning activity types: Deselect an option to remove those courses with learning activity types: Online (CBL) or Classroom (ILT).
Uncheck the Filter by Course Development Status: Retired.
Select the Display Options: Display Course Details.

Run the report and you can export the results as an Excel.

NOTE: some courses charge a license fee and should only be assigned if you have explicit permission to do so. These courses include, but are not limited to, American Red Cross Resuscitation, NRP, AWHONN.

NRP 8th Edition

Please review the corresponding Tip Sheet:

Request An Appointment

Fill out a quick form and a Catholic Health representative will call you to schedule an appointment.

Request an Appointment